A. Bagian awal
Halaman Judul :
Sebuah judul pada dasarnya meng-gambarkan kelengkapan menganalisis, jangkauan wilayah, domain penelitian, waktu dan metode yang dipakai serta kesimpulan yang didapat.
Syarat judul karangan :
(1) Tepat artinya segala isi yang terkandung di dalam karangan itu dapat terlihat dari judul tersebut.
(2) Ekonomis maksudnya judul sebaiknya sependek mungkin tanpa mengu-rangi arti atau isi atau luas lingkungan yang tercakup di dalam karangan.
(3) Langsung maksudnya judul karangan tidak perlu berbelit-belit dan dibuat-buat supaya tampak ilmiah.
(4) Jelas maksudnya bahasa, kalimat dan kata-kata yang dipergunakan di dalam judul karangan hendaknya bahasa, kalimat dan kata-kata yang dapat dimengerti dan dapat dihindari kalimat-kalimat atau kata-kata yang kabur atau ambivalen. Istilah-istilah yang terdapat di dalam judul itu haruslah tepat dan dapat dipertanggungjawabkan oleh penga-rang.
(5) Sederhana
(6) Baru
(7) Logis artinya judul karangan itu benar dari segi ilmiah, dan beralasan menurut logika.
Judul dalam
Halaman pengesahan
Kata Pengantar :
Berisi tentang ucapan puji syukur, rasa terimakasih penulis kepada siapapun yang terlibat atau yang membantu dalam penulisan karya ilmiah penulis tersebut.
Daftar Isi :
Maksud penyusunan daftar isi terutama untuk memudahkan pembaca (dan pengarang) untuk mengetahui klasifikasi dan keseluruhan isi karangan.
Daftar Tabel, Bagan, Foto, Gambar :
Maksud utama penyusunan statistik adalah untuk memudah-kan pandangan sehingga sekaligus dapat menggambarkan ke-seluruhan peristiwa. Di samping itu untuk memudahkan inter-pretasi dan analisa.
B. Bagian isi
Bab I Pendahuluan
Paparan tentang apa yang menjadi masalah dengan latar belakangnya
1. Latar belakang : diskripsi masalah, data awal yang mendukung adanya masalah dan akar timbulnya masalah. Mengapa dan apa yang mendorong peneliti memilih topik penelitian ini.
2. Rumuskan masalah secara jelas, singkat, termasuk konsep-konsep yang digunakan, masalah dibatasi, bagian mana yang digarap, mengapa bagian itu yang diambil, dan gambarkan pentingnya masalah: sumbangannya terhadap perkembangan ilmu, kegunaan praktis (bila ada), hubungan dengan penelitian lain Kegunaan yang lebih umum.
3. Tujuan penelitian
4. Manfaat penelitian
Bab II Landasan teori
Paparan tentang kerangka acuan atau objek yang sudah digunakan dalam memecahkan masalah. Gambarkan konsep-konsep yang digunakan, pendekatan yang digunakan, gambarkan teori-teori yang pernah ada yang berkaitan dengan masalah yang digarap, mengemukakan asumsi-asumsi dasar sebagai landasan berpikir, dan kemukakan hipotesis bila ada. Umumnya dikemukakan dalam bagian kerangka teoritis atau landasan teori atau teori.
Bab III METODE penelitian
Paparan mengenai apa yang dilakukan dalam suatu penelitian (langkah-langkah) yang dilakukan sebelum melakukan suatu penelitian dan dikemas dalam bagian metode penelitian.
Bab IV Hasil penelitian dan pembahasan
Jawaban terhadap pertanyaan apa yang dikemukakan umumnya dikemukakan dalam bagian temuan atau hasil. Hasil-hasil penelitian harus mampu berfungsi sebagai alat pembuktian.
Bab V kesimpulan dan saran
Kesimpulan, sebagai pernyataan singkat yang mengungkapkan hasil penyelidikan secara menyeluruh. Saran, sebagai pernyataan yang bertujuan untuk penyempurnaan hasil akhir penyelidikan.
Kesimpulan memuat hasil sesuai dengan tujuan penelitian, penulis harus dapat menjelaskan kepentingan akan temuannya, bukan merupakan pengulangan yang telah dibahas pada bagian pembahasan, harus menceritakan pada pembaca mengapa temuan ini penting, dan bagaimana temuan ini berkontribusikan terhadap pengembangan ilmu pengetahuan dan teknologi, serta penelitian apa yang harus dilakukan kemudian.
bab vi abstrak
Abstrak adalah suatu bagian uraian yang sangat singkat, jarang lebih panjang dari enam atau delapan baris, bertujuan untuk menerangkan kepada pembaca-pembaca aspek-aspek mana yang tercakup dalam se-buah uraian tanpa berusaha mengatakan apa yang dibicarakan mengenai aspek-aspek itu.
BAB VII referensi : kutipan, catatan kaki, dan daftar pustaka
Kutipan. Pembuatan skripsi dan karya ilmiah mengharuskan para penulis mencari sumber informasi ilmiah yang diperlukan untuk penulisan tersebut. Pengetahuan ilmiah yang dikutip dari seseorang dipergunakan untuk berbagai tujuan sesuai dengan argumentasi yang diajukan, misalnya untuk mendukung pernyataan penulis atau mendefinisikan sesuatu. Kutipan-kutipan tersebut dapat berbentuk “kutipan langsung” atau “kutipan tidak langsung”. Kutipan langsung yang pendek dimasukkan dalam teks atau tubuh skripsi dengan menggunakan tanda kutip
Catatan kaki atau notasi ilmiah cukup penting untuk diperhatikan dalam menulis karya ilmiah. Notasi ilmiah adalah catatan pendek untuk mengetahui sumber informsi ihniah yang dikutip dalam suatu karya ilmiah.[i] Karena catatan tersebut diletakkan di bagian bawah halaman maka sering disebut catatan kaki atau footnote. Catatan kaki tidak hanya digunakan untuk mengetahui dan mendalami sumber informasi tetapi juga untuk memberikan catatan tambahan tentang suatu informasi dalam penulisan ilmiah tanpa mengganggu keseluruhan penulisan tersebut. catatan kaki mencakup:
(1) nama penulis,
(2) judul tulisan,
(3) tempat pener-bitan,
(4) nama penerbit,
(5) tahun penerbitan,
(6) halaman yang dikutip.
Daftar pustaka dapat berupa buku, jurnal, majalah, media masa, kertas kerja, ensiklopedi, internet, dan bahan penerbitan lain (termasuk komunikasi pribadi). Fungsi daftar pustaka:
(a) Sebagai alat untuk melihat kembali sumber asli oleh ilmuwan lain, sehingga ilmuwan lain dapat melihat benar atau tidaknya pengutipan pernyataan di dalam bahan pustaka yang digunakan atau bahkan dapat digunakan sebagai alat untuk melihat perkembangan ilmu.
(b) Untuk mengetahui lebih jauh tentang sumber acuan yang terdapat dalam sebuah catatan kaki.
(c) Untuk melihat cakupan keilmuan seluruh isi tulisan ilmiah sebagai indikator mutu isinya, dengan catatan bahwa semakin terspesialisasi bahan pustaka yang digunakan maka semakin tinggi nilai tulisan ilmiah.
(d) Untuk mengetahui dampak ilmiah dari tulisan ilmiah.
Tata aturan penulisan daftar pustaka:
(a) Penulisan daftar pustaka disusun secara alfabetis, dari A -Z, dengan patokan pada huruf pertama dari nama keluarga atau marga penulis.
(b) Penulisan nama orang Indonesia yang lebih dari satu kata, adalah kata kedua dianggap sebagai nama keluarga dengan disertai tanda-baca koma (,) diikuti singkatan kata pertama dan diakhiri dengan tanda titik (.). (Catatan: apabila suatu bahan pustaka tidak terinformasi penulisnya, maka nama penulis tidak boleh ditulis dengan Anonim).
(c) Setelah nama pengarang, berikutnya ditulis tahun penerbitan bahan pustaka dan diakhiri dengan tanda titik. (d) Setelah tahun terbit bahan pustaka, berikutnya ditulis judul bahan pustaka yang diketik miring diakhiri dengan tanda titik (.).
(e) Setelah nama bahan pustaka, selanjutnya ditulis
(1) nama penerbit untuk bahan pustaka berupa buku, dan
(2) nama jurnal beserta volume, nomor, tahun terbit, dan halaman bahan pustaka yang dibaca untuk artikel ilmiah yang diterbitkan dalam bentuk jurnal.
(f) Bagian terakhir adalah nama kota dari alamat penerbit untuk bahan pustaka berupa buku. (g) Apabila nama penulis dari bahan pustaka yang dirujuk lebih dari satu, maka penulis ke-2 dan ke-3 urutan kata namanya tetap seperti nama aslinya hanya kata pertama dan/atau kedua disingkat.
Sumber :
http://veblue.blogspot.com/2010/03/tahapan-penulisan-karya-ilmiah.html
http://www.blogdunia.co.cc/2010/07/langkah-langkah-penulisan-karya-ilmiah.html
Metode Ilmiah
|
Rabu, 16 Maret 2011
Metode ilmiah boleh dikatakan suatu pengejaran terhadap kebenaran yang diatur oleh pertimbangan-pertimbangan logis. Karena ideal dari ilmu adalah untuk memperoleh interelasi yang sistematis dari fakta-fakta, maka metode ilmiah berkehendak untuk mencari jawaban tentang fakta-fakta dengan menggunakan pendekatan kesangsian sistematis. Karena itu, penelitian dan metode ilmiah mempunyai hubungan yang dekat sekali, jika tidak dikatakan sama. Dengan adanya metode ilmiah, pertanyaan-pertanyaan dalam mencari dalil umum akan mudah terjawab, seperti menjawab seberapa jauh, mengapa begitu, apakah benar, dan sebagainya.
Menurut Almadk (1939),” metode ilmiah adalah cara menerapkan prinsip-prinsip logis terhadap penemuan, pengesahan dan penjelasan kebenaran. Sedangkan Ostle (1975) berpendapat bahwa metode ilmiah adalah pengejaran terhadap sesuatu untuk memperoleh sesuatu interelasi.”
Metode ilmiah dalam meneliti mempunyai kriteria serta langkah-langkah tertentu dalam Metode ilmiah bekerja. seperti di bawah ini.
Kriteria
1. Berdasarkan fakta
2. Bebas dari prasangka
3. Menggunakan prinsip-prinsip analisa
4. Menggunakan hipolesa
5. Menggunakan ukuran objektif
6. Menggunakan teknik kuantifikasi
Langkah-langkah
1. Memilih dan mendefinisikan masalah.
2. Survei terhadap data yang tersedia.
3. Memformulasikan hipotesa.
4. Membangun kerangka analisa serta alat-alat dalam menguji hipotesa.
5. Mengumpulkan data primair.
6. Mengolah, menganalisa serla membuat interpretasi.
7. Membual generalisasi dan kesimpulan.
8. Membuat Laporan
KRITERIA METODE IMIAH
Supaya suatu metode yang digunakan dalam penelitian disebut metode ilmiah, maka metode tersebut harus mempunyai kriteria sebagai berikut:
1. Berdasarkan fakta.
2. Bebas dari prasangka (bias)
3. Menggunakan prinsip-prinsip analisa.
4. Menggunakan hipotesa
5. Menggunakah ukuran objektif.
6. Menggunakan teknik kuantifikasi.
6.1. Berdasarkan Fakta
Keterangan-keterangan yang ingin diperoleh dalam penelitian, baik yang akan dikumpulkan dan yang dianalisa haruslah berdasarkan fakta-fakta yang nyata. Janganlah penemuan atau pembuktian didasar-kan pada daya khayal, kira-kira, legenda-legenda atau kegiatan sejenis.
6.2. Bebas dari Prasangka
Metode ilmiah harus mempunyai sifat bebas prasangka, bersih dan jauh dari pertimbangan subjektif. Menggunakan suatu fakta haruslah dengan alasan dan bukti yang lengkap dan dengan pembuktian yang objektif.
6.3. Menggunakan Prinsip Analisa
Dalam memahami serta member! arti terhadap fenomena yang kompleks, harus digunakan prinsip analisa. Semua masalah harus dicari sebab-musabab serta pemecahannya dengan menggunakan analisa yang logis, Fakta yang mendukung tidaklah dibiarkan sebagaimana adanya atau hanya dibuat deskripsinya saja. Tetapi semua kejadian harus dicari sebab-akibat dengan menggunakan analisa yang tajam.
6.4. Menggunakan Hipotesa
Dalam metode ilmiah, peneliti harus dituntun dalam proses berpikir dengan menggunakan analisa. Hipotesa harus ada untuk mengonggokkan persoalan serta memadu jalan pikiran ke arah tujuan yang ingin dicapai sehingga hasil yang ingin diperoleh akan mengenai sasaran dengan tepat. Hipotesa merupakan pegangan yang khas dalam menuntun jalan pikiran peneliti.
6.5. Menggunakan Ukuran Obyektif
Kerja penelitian dan analisa harus dinyatakan dengan ukuran yang objektif. Ukuran tidak boleh dengan merasa-rasa atau menuruti hati nurani. Pertimbangan-pertimbangan harus dibuat secara objektif dan dengan menggunakan pikiran yang waras.
6.6. Menggunakan Teknik Kuantifikasi
Dalam memperlakukan data ukuran kuantitatif yang lazim harus digunakan, kecuali untuk artibut-artibut yang tidak dapat dikuantifikasikan Ukuran-ukuran seperti ton, mm, per detik, ohm, kilogram, dan sebagainya harus selalu digunakan Jauhi ukuran-ukuran seperti: sejauh mata memandang, sehitam aspal, sejauh sebatang rokok, dan sebagai¬nya Kuantifikasi yang termudah adalah dengan menggunakan ukuran nominal, ranking dan rating
LANGKAH DALAM METODE ILMIAH
Pelaksanaan penelitian dengan menggunakan metode ilmiah harus mengikuti langkah-langkah tertentu. Marilah lebih dahulu ditinjau langkah-langkah yang diambil oleh beberapa ahli dalam mereka melaksanakan penelitian.
Schluter (1926) memberikan 15 langkah dalam melaksanakan penelitian dengan metode ilmiah. Langkah-langkah tersebut adalah sebagai berikut:
1. Pemilihan bidang, topik atau judul penelitian.
2. Mengadakan survei lapangan untuk merumuskan masalah-malalah yang ingin dipecahkan.
3. Membangun sebuah bibliografi.
4. Memformulasikan dan mendefinisikan masalah.
5. Membeda-bedakan dan membuat out-line dari unsur-unsur permasalahan.
6. Mengklasifikasikan unsur-unsur dalam masalah menurut hu-bungannya dengan data atau bukti, baik langsung ataupun tidak langsung.
7. Menentukan data atau bukti mana yang dikehendaki sesuai dengan pokok-pokok dasar dalam masalah.
8. Menentukan apakah data atau bukti yang dipertukan tersedia atau tidak.
9. Menguji untuk diketahui apakah masalah dapat dipecahkan atau tidak.
10. Mengumpulkan data dan keterangan yang diperlukan.
11. Mengatur data secara sistematis untuk dianalisa.
12. Menganalisa data dan bukti yang diperoleh untuk membuat interpretasi.
13. Mengatur data untuk persentase dan penampilan.
14. Menggunakan citasi, referensi dan footnote (catatan kaki).
15. Menulis laporan penelitian.
Dalain melaksanakan penelitian secara ilmiah. Abclson (1933) mcmberikan langkah-langkah berikut:
1. Tentukan judul. Judul dinyatakan secara singkat
2. Pemilihan masalah. Dalam pemilihan ini harus: a). Nyatakan apa yang disarankan oleh judul. b). Berikan alasan terhadap pemilihan tersebut. Nyatakan perlunya diselidiki masalah menurut kepentingan umum. c). Sebutkan ruang lingkup penelitian. Secara singkat jelaskan materi. situasi dan hal-hal lain yang menyangkut bidang yang akan diteliti.
3. Pemecahan masalah. Dalain niemecahkan masalah harus diikuti hal-hal berikut: a).
Analisa harus logis. Aturlah bukti dalam bnntuk yang sistematis dan logis. Demikian juga halnya unsur-unsur yang dapat memecahkan masalah. b). Proscdur penelitian yang digunakan harus dinyatakan secara singkat. c) Urutkan data, fakta dan keterangan-keterangan khas yang diperlukan d). Harus dinyatakan bagaimana set dari data diperoleh termasuk referensi yang digunakan. e). Tunjukkan cara data dilola sampai mempunyai arti dalam memecahkan masalah. f). Urutkan asumsi-asumsi yang digunakan serta luibungannya dalam berbagai fase penelitian.
4. Kesimpulan
a). Berikan kesimpulan dari hipotesa. nyatakan dua atau tiga kesimpulan yang mungkin diperoleh b). Berikan implikasi dari kesimpulan. Jelaskan bebernpa implikasi dari produk hipotesa dengan memberikan beberapa inferensi.
5. Berikan studi-studi sebelumnya yang pernah dikerjakan yang berhubungan dengan masalah.
Nyalakan kerja-kerja sebelumnya secara singkat dan berikan referensi bibliografi yang mungkin ada manfaatnya scbagai model dalam memecahkan masalah. Dari pedoman beberapn ahli di atas, maka dapal disimpulkan balnwa penelitian dengan mcnggunakan metode ilmiah sckurang-kurangnya dilakukan dengan langkah-langkah berikut:
5.1. Merumuskan serta mcndefinisikan masalah
langkah pertama dalam meneliti adalah menetapkan masalah yang akan dipecahkan. Untuk menghilangkan keragu-raguan. masalah tersebut didefinisikan secara jelas. Sampai ke mana luas masalah yang akan dipecahkan Sebutkan beberapa kata kunci (key words) yang terdapal dalam masalah Misalnya. masalah yang dipilih adalah Bagaimana pengaruh mekanisasi terhadap pendapatan usaha tani di Aceh?
Berikan definisi tentang usaha tani, tentang mekanisasi, pada musim apa. dan sebagainya
5.2. Mengadakan studi kepustakaan
Setelah masalah dirumuskan, step kedua yang dilakukan dalam mencari data yang tersedia yang pernah ditulis peneliti sebelumnya yang ada hubungannya dengan masalah yang ingin dipecahkan. Kerja mencari bahan di perpustakaan merupakan hal yang tak dapat dihindarkan olch seorang peneliti. Ada kalanya. perumusan masalah dan studi keputusan dapat dikerjakan secara bersamaan.
5.3. Memformulasikan hipotesa
Setelah diperoleh infonnasi mengenai hasil penelitian ahli lain yang ada sangkut-pautnya dengan masalah yang ingin dipecahkan. maka tiba saatnya peneliti memformulasikan hipotesa-hipolesa unttik penelitian. Hipotesa tidak lain dari kesimpulan sementara tentang hubunggan sangkut-paut antarvariabel atau fenomena dalam penelitian. Hipotesa merupakan kesimpulan tentatif yang diterima secara sementara sebelum diuji.
5.4. Menentukan model untuk menguji hipotesa
Setelah hipotesa-hipotesa ditetapkan. kerja selanjutnya adalah merumuskan cara-cara untuk menguji hipotesa tersebut. Pada ilmu-ilmu sosial yang telah lebih berkembang. scperti ilmu ekonomi misalnva. pcnguji’an hipotesa didasarkan pada kerangka analisa (analytical framework) yang telah ditetapkan. Model matematis dapat juga dibuat untuk mengrefleksikan hubungan antarfenomena yang secara implisif terdapal dalam hipotesa. untuk diuji dengan teknik statistik yang tersedia.
Pcngujian hipotesa menghendaki data yang dikumpulkan untuk keperluan tersebut. Data tersebut bisa saja data prime ataupun data sekunder yang akan dikumpulkan oleh peneliti.
5.5. Mengumpulkan data
Peneliti memerlukan data untuk menguji hipotesa. Data tersebut yang merupakan fakta yang digunakan untuk menguji hipotesa perlu dikumpulkan. Bcrgantung dan masalah yang dipilih serta metode pcnelitian yang akan digunakan. teknik pengumpulan data akan berbeda-beda. Jika penelitian menggunakan metode percobaan. misalnya. data diperoleh dan plot-plot pcrcobaan yang dibual sendiri oleh peneliti Pada metodc scjarah ataupun survei normal, data diperoleh dengan mcngajukan pertanyaan-pertanyaan kepada responden. baik secara langsung ataupun dengan menggunakan questioner Ada kalanya data adalah hasil pengamatan langsung terhadap perilaku manusia di mana peneliti secara partisipatif berada dalam kelompok orang-orang yang diselidikinya.
5.6. Menyusun, Menganalisa, and Menyusun interfensi
Setelah data terkumpul. pcneliti menyusun data untuk mengadakan analisa Sebelum analisa dilakukan. data tersebul disusun lebih dahulu untuk mempermudah analisa. Penyusunan data dapat dalam bentuk label ataupun membuat coding untuk analisa dengan komputer. Sesudah data dianalisa. maka perlu diberikan tafsiran atau interpretasi terhadap data tersebut.
5.7. Membuat generalisasi dan kesimpulan
Setelah tafsiran diberikan, maka peneliti membuat generalisasi dari penemuan-penemuan, dan selanjutnya memberikan beberapa kesimpulan. Kesimpulan dan generalisasi ini harus berkaitan dengan hipotesa. Apakah hipotesa benar untuk diterima. ataukah hiporesa tersebut ditolak.
5.8. Membuat laporan ilmiah
Langkah terakhir dari suatu penelitian ilmiah adalah membuat laporan ilmiah tentang hasil-hasil yang diperoleh dari penelitian tersebut. Penulisan secara ilmiah mempunyai teknik tersendiri.
Sumber :
http://dossuwanda.wordpress.com/2008/03/29/apakah-yang-dimaksud-dengan-metode-penelitian.html/
http://www.gudangmateri.com/2011/02/pengertian-metode-penelitian.html
Review Power Color Radeon 6950 2Gb
|
Rabu, 02 Maret 2011
Pada kesempatan kali ini disaat liburan 1 hari dirumah dan daripada menganggur saya memanfaatkan untuk mereview vga keluaran terbaru dari AMD yaitu AMD Radeon 6950 dari Brand PowerColor.
AMD menempatkan 6950 dengan berbagai fiture baru diantaranya
EQAA = Enhanced Quality Anti Aliasing
EQAA adalah fiture baru dari amd radeon yang digunakan untuk memperhalus dan mempertajam gambar dengan meminimalisir jaggies yang kurang lebih mirip dengan CSAA milik nvidia dimana 2x EQAA setara dengan 4x CSAA milik NVIDIA

2Gb Memory
AMD memberikan Memory sebesar 2Gb yang menurut saya digunakan untuk mendukung prose sati Eyenity di beberapa layar monitor. Mungkin juga kedepannya bakalan digunakan untuk menghajar game-game berat yang haus akan memory .
Tidak hanya itu AMD juga telah memperbaiki Tessellation dengan yang baru melalui arsitektur baru yang sebelumnya tidak mampu memberikan hasil yang maksimal seperti rivalnya.
Amd juga merubah arsitektur dimana sebelumnya kita mengetahui bahwa HD5870 memiliki 1600 Stream Prosesing Unit yang malahan kini dikurangi menjadi 1408 namun jauh lebih baik dari 1600 SP/5 VLIW.
Unlock To AMD Radeon 6970
Entah Isu ini benar atau tidak nanti kita akan mengetahui jawabannya.
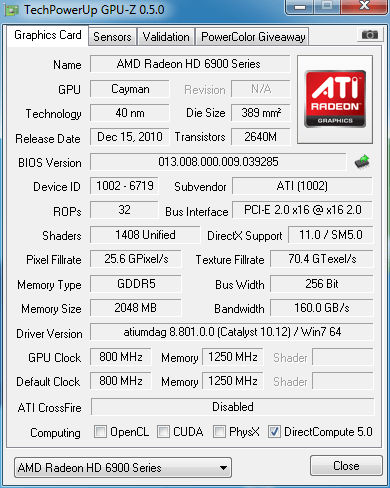
Langsung saja kita simak beberapa spek yang saya ambil langsung dari web PowerColor dan gambar saya ambil 2 buah saja dari internet karena kamera rusak dan perihal lainnya yang kurang memadai
Graphics Engine
RADEON HD6950
Video Memory
2GB GDDR5
Engine Clock
800MHz
Memory Clock
1250MHz (5.0Gbps)
Memory Interface
256bit
DirectX® Support
11
bus Standard
11PCIE 2.1
Standard Display Connecors
DL-DVI-I/SL-DVI-D/HDMI/2* mini DisplayPort
Feature Support
OpenGL
Support
CrossFireX™ Technology
Support
ATI Stream Technology
Support
ATI Eyefinity Technology
Support
System Test
Windows 7 Ultimate 64 Bit
Intel core i5 750 @4Ghz
MSI P55 GD65
4Gb Ram DDR3
Seasonic M12II 620 W
Gambar arround the web


Screen Gpu-Z Asli
Cpu-Z

Vanttage Default

3dMark11 Pmode

3dmark11 xMode

TessMark(GPU Tessellation Benchmark)

FFXIV Benchmark

Furmark Test

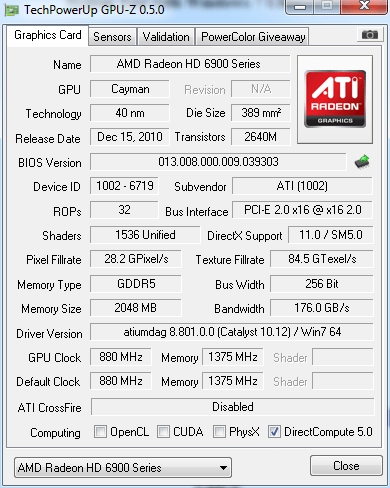
Unlock Test
Dengan memflash bios PowerColor 6950 ke bios PowerColor 6970 ternyata vga ini mampu terunlock menjadi 6970 .
Gpu Z
Vanttage Default

3dMark11 pMode

3dMark11 xMode

TessMark(GPU Tessellation Benchmark)

FFXIV Benchmark

Furmark Test

Ternyata mampu melewati beberapa benchmark diatas secara aman, namun perlu diingat mengingat men unlock VGA ini maka Vgpu akan mengikuti milik 6970 maka untuk amannya tingkatkan putaran fan 55%(Hanya Saran)
Perbandingannya antara sebelum dan sesudah Unlock


Kesimpulan
(+)
1. New Fiturw EQAA
2. 2Gb Memory
3. Dual Bios
4. Low Noise
5. Unlock To 6970( AMD Surprice )
)
(-)
1. Suhu Tinggi Karena putaran fan rendah
Sekian review ini saya buat semoga bermanfaat buat para pemakainya ataupun bagi user yang ingin memilih dengan terlebih dahulu melihat performance dari kartu grafis ini. Mohon maaf apabila banyak ketidak sempurnaan dari review ini yang dikarenakan keterbatasan software untuk benchmark.
AMD menempatkan 6950 dengan berbagai fiture baru diantaranya
EQAA = Enhanced Quality Anti Aliasing
EQAA adalah fiture baru dari amd radeon yang digunakan untuk memperhalus dan mempertajam gambar dengan meminimalisir jaggies yang kurang lebih mirip dengan CSAA milik nvidia dimana 2x EQAA setara dengan 4x CSAA milik NVIDIA
2Gb Memory
AMD memberikan Memory sebesar 2Gb yang menurut saya digunakan untuk mendukung prose sati Eyenity di beberapa layar monitor. Mungkin juga kedepannya bakalan digunakan untuk menghajar game-game berat yang haus akan memory .
Tidak hanya itu AMD juga telah memperbaiki Tessellation dengan yang baru melalui arsitektur baru yang sebelumnya tidak mampu memberikan hasil yang maksimal seperti rivalnya.
Amd juga merubah arsitektur dimana sebelumnya kita mengetahui bahwa HD5870 memiliki 1600 Stream Prosesing Unit yang malahan kini dikurangi menjadi 1408 namun jauh lebih baik dari 1600 SP/5 VLIW.
Unlock To AMD Radeon 6970
Entah Isu ini benar atau tidak nanti kita akan mengetahui jawabannya.
Langsung saja kita simak beberapa spek yang saya ambil langsung dari web PowerColor dan gambar saya ambil 2 buah saja dari internet karena kamera rusak dan perihal lainnya yang kurang memadai
Graphics Engine
RADEON HD6950
Video Memory
2GB GDDR5
Engine Clock
800MHz
Memory Clock
1250MHz (5.0Gbps)
Memory Interface
256bit
DirectX® Support
11
bus Standard
11PCIE 2.1
Standard Display Connecors
DL-DVI-I/SL-DVI-D/HDMI/2* mini DisplayPort
Feature Support
OpenGL
Support
CrossFireX™ Technology
Support
ATI Stream Technology
Support
ATI Eyefinity Technology
Support
System Test
Windows 7 Ultimate 64 Bit
Intel core i5 750 @4Ghz
MSI P55 GD65
4Gb Ram DDR3
Seasonic M12II 620 W
Gambar arround the web
Screen Gpu-Z Asli
Cpu-Z
Vanttage Default
3dMark11 Pmode
3dmark11 xMode
TessMark(GPU Tessellation Benchmark)
FFXIV Benchmark
Furmark Test
Unlock Test
Dengan memflash bios PowerColor 6950 ke bios PowerColor 6970 ternyata vga ini mampu terunlock menjadi 6970 .
Gpu Z
Vanttage Default
3dMark11 pMode
3dMark11 xMode
TessMark(GPU Tessellation Benchmark)
FFXIV Benchmark
Furmark Test
Ternyata mampu melewati beberapa benchmark diatas secara aman, namun perlu diingat mengingat men unlock VGA ini maka Vgpu akan mengikuti milik 6970 maka untuk amannya tingkatkan putaran fan 55%(Hanya Saran)
Perbandingannya antara sebelum dan sesudah Unlock
Kesimpulan
(+)
1. New Fiturw EQAA
2. 2Gb Memory
3. Dual Bios
4. Low Noise
5. Unlock To 6970( AMD Surprice
)(-)
1. Suhu Tinggi Karena putaran fan rendah
Sekian review ini saya buat semoga bermanfaat buat para pemakainya ataupun bagi user yang ingin memilih dengan terlebih dahulu melihat performance dari kartu grafis ini. Mohon maaf apabila banyak ketidak sempurnaan dari review ini yang dikarenakan keterbatasan software untuk benchmark.
Review Corsair AX 850 From Johny Guru
|
Page 1 -
Page 4 -
Page 5 -
http://www.jonnyguru.com/modules.php?name=NDReviews&op=Story&reid=197
Sometimes big things come in small packages. In today's review, a small thing comes in a large package. A VERY large package. How large, you ask?

The Corsair AX850 power supply comes in a box that is 15.5" long. That's 390mm! One would think that with a box this large, there must be something large inside. Certainly, more than just a power supply. Perhaps every Corsair AX850 comes with a 6GB kit of Dominator GT DDR3 memory and a 128GB Voyager thumb drive? Oooh... one could only hope.
Well, before we crack the seal on this box and see what's actually inside, let's see what kind of propaganda Corsair puts on all of this real estate.

In five languages, I am told that this in a high-performance ATX power supply.

On the back of the box, again in five languages, I am given quite the back story:

Wow! Talk about setting the bar high. "Mission-critical stability", "one of the best", "90% efficiency at 50% load".... That's why we're here today folks!
Way in the lower right hand side of the back of the box, we have the DC output capability of this power supply....
| Corsair | +3.3V | +5V | +12V | -12V | +5VSB |
| 25A | 25A | 70A | 0.5A | 3A | |
| Max Power | 125W | 840W | 6W | 15W | |
| 850W | |||||
Along the top of the back of the box, we are told what kind of connectors to expect inside. This is important for those who might have a dual processor board that requires both 8-pin and 4-pin or two 8-pin CPU power connectors or two 300W PCI Express graphics cards that will require four PCIe connectors, two of which will need to be 8-pin PCIe power connectors:

We'll cover all the cables, connectors, their lengths, etc. on the next page once we open this box up. Let's keep looking around this huge box we have here....
On the side of the box, we're given a few more bullet-points and some nifty logos...

Once again we're reminded that this PSU should have mission-critical stability. Apparently, the flexibility is unprecedented due to the 100% modularity. Hmm... Unprecedented means "without previous instance; never before known or experienced; unexampled or unparalleled." I guess all those fully modular Ultra Products and SilverStone power supplies were overlooked when looking for prior art. And now that BFG is out of business and can no longer support their Lifetime Warranty, Corsair does have industry leading warranty and support with it's 7 year warranty.
The logos represent Corsair's 7 year warranty, that the PSU is certified by 80 Plus to perform to 80 Plus Gold standards, that the PSU meets the requirements of the E.U. for an Energy Using Product (EuP) and finally... this unit is ready to be installed in a sixth generation Corvette. Wait... what?
This one actually required an email to Corsair as I have never heard of "C6 Ready" or have seen a "C6 Ready" logo. As it turns out, the C6 Corsair is referring to is the C6 state of an Intel processor, also known as the deep power down state. The C6 state reduces the CPU's core voltage and shuts off power to the core clock and cache thus reducing power consumption. What Corsair means by "C6 Ready" is that even in this power state, which results in a very low load on the power supply, the power supply will still put out voltages that are within specification. I'm sure there are some power supplies out there that might not be C6 ready... right? But I digress...
Finally, from the other side of the box:

Naturally, this PSU has auto-switching circuitry that provides a wide range of AC input, it supports ATX12V 2.3 and EPS12V 2.91 (needs two usable CPU power connectors) and is backwards compatible with older ATX12V specifications. Finally, the dimensions of the unit. 150mm x 86mm x 160mm. Wait? 160mm deep? That's really small... and less than half the size of this box! Well... we know that it's not the PSU taking up all the space in this box. Let's open it up and see what's inside.
Page 2 -

Hmm... it looks like the power cable, a bag of modular cables and an accessory pack take up 1/3 of the box while the other 2/3 of the box is a giant chunk of foam with a manual placed on top.

Lifting off the top half of the foam exposes a bag containing the power supply. Here we can see that the foam is VERY thick, providing more than adequate protection for the power supply.
It's interesting that Corsair went with so much foam in this box. On one hand, the unit is definitely protected and perhaps this will reduce failures caused by rough handling once deployed into the field. But the product manager side of me is concerned with shipping costs and how few units you can put into a master pack and how few units will fit on a pallet. I would expect these increased shipping costs trickle down to the retail price the end user pays.

Once everything is unpacked, we can see our AX850 power supply unit, the manual, a pack of zip-ties, a case badge, four mounting screws, a power cord and a nylon bag with all of our modular cables.

Here is a closer look of those accessories.

Opening the nylon bag exposes a hodge podge of modular cables. Some cables are sleeved while others are the flat type of cables like those used on the HX power supply. With the HX power supply, all of the modular cables were flat while the fixed cables were sleeved. This was unfortunate because the cables typically routed underneath the motherboard would be the 24-pin ATX and the 4-pin or 8-pin CPU power connector, and having these cables flat helps routing these cables between the motherboard and motherboard tray. It is understandable why Corsair would not make the fixed cables the all black flat type like the modular ones. Without having the wires color coded, labor and quality control becomes difficult because the workers cannot differentiate the different voltage wires that need to be soldered down to the PCB. With the AX being fully modular, they have the opportunity to make all of the cables flat and easier to route, but instead, the 24-pin ATX and 4-pin and 8-pin CPU and PCIe power connector cables are all still the usual sleeved type. Hmm... what a shame.

Here is the 24-pin power connector and two 4+4-pin CPU power connectors. As you can see, all three are sleeved.

Here are our two PCIe power cables. Each has a 6-pin and 6+2-pin PCIe power connector. Instead of doing the usual 550mm of cable, one connector and then a second connector 150mm later down the line, the AX850 employs two 600mm coming out of one connector. This means that if you only use one of the two connectors, you have a 600mm long cable that you need to hide. Then again, if you're not using at least two PCIe power connectors, you don't need an 850W power supply.

And here is our assortment of flat modular cables: all peripheral and SATA.

Floppy power is derived by using the included peripheral to floppy adapters.
Below is a table showing all of the included cables and the lengths of those cables, as well as a recap of the unit's dimensions:
| Type of connector: | Quantity: |
| 24-pin ATX connector (600mm) | 1 |
| 4+4-pin ATX12V/EPS12V (600mm) | 2 |
| PCIe (600mm) | 4 |
| SATA (2 cables w/ 2 connectors each) (450mm+150mm) | 4 |
| SATA (2 cables w/ 4 connectors each) (400mm+150mm+150mm+150mm) | |
| 5.25" Peripheral Power Connector (2 cables w/ 4 connectors each) (400mm+150mm+150mm+150mm) | 8 |
| 3.5" Drive power adapter (+100mm) | 2 |
| Unit Dimensions(L x W x H) | |
| 160mm x 86mm x 150mm | |
Now let's have a closer look at the unit itself before we plug it up to the load tester and see how it performs.


In the above two photos we can see that the AX850 has a relatively compact size. 150mm x 160mm is as small as you can get and still use a 140mm fan. Ironically, this unit actually uses a 120mm fan instead.

Here we can see the modular interface of the AX850. The holographic sticker in the upper left hand corner shows that the licensing fee has been paid to Ultra Products for their patent on computer power supply modularity.

Finally, here is a shot of the back of the unit. As we can see, it's a honeycomb-style exhaust vent and we have an on/off switch. Now let's move on to the load testing.
Page 3 -
All testing is done using an SM-8800 active load tester in a 20°C room. Artificial static loads are placed on each rail, then voltages and total wattage is recorded. The loads represent a +5VSB only load, 10%, 20%, 35%, 50%, 65%, 80% and 100% as well as two cross-loads: High +12V and high +3.3V & +5V. The amount of wattage being pulled from the wall is also recorded and efficiency calculated. I also record the power factor of the unit. This particular unit has no -5V rail and we do not load test the rarely used -12V rail, so there are no results for those two rails.
Test 0 is the PSU in it's soft off mode with only a 2A load on the +5VSB. This test will show us the PSU's standby efficiency. Test 1 is the same as test 0, but we've turned the PSU on. Test 2 through 8 are our progressively increased loads (10% to 100%) and test 9 and 10 are our crossloads.
Temperatures are measured at both the intake fan and exhaust grill of the PSU.
| Corsair AX850 COLD load tests | ||||||||
| Test # | +3.3V | +5V | +12V | +5VSB | DC Watts/ | Eff. | Power | Intake/ |
| Simulated system load tests | ||||||||
| Test | 0A | 0A | 0A | 2A | 5W/ | 81% | .46 | 25°C/ |
| N/A | N/A | N/A | 5.06V | |||||
| Test | 0A | 0A | 0A | 2A | 10.1W/ | 46.1% | .81 | 25°C/ |
| 3.38V | 5.02V | 12.17V | 5.06V | |||||
| Test | 1.5A | 2A | 5A | 2A | 85.7W/ | 82.3% | .96 | 25°C/ |
| 3.37V | 5.01V | 12.14V | 5.05V | |||||
| Test | 2.5A | 4A | 11A | 2A | 171.5W/ | 86.7% | .98 | 25°C/ |
| 3.35V | 4.99V | 12.13V | 5.03V | |||||
| Test | 4A | 7A | 20A | 2A | 299.9W/ | 89.5% | .99 | 27°C/ |
| 3.33V | 4.97V | 12.07V | 5.02V | |||||
| Test | 5A | 10A | 29A | 2A | 425.2W/ | 89.4% | .99 | 21°C/ |
| 3.31V | 4.95V | 12.05V | 5.00V | |||||
| Test | 6.5A | 13A | 38A | 2A | 551.3W/ | 88.5% | .99 | 21°C/ |
| 3.29V | 4.93V | 12.01V | 4.98V | |||||
| Test | 8.5A | 15.5A | 47A | 2A | 674.7W/ | 87.3% | 1.00 | 22°C/ |
| 3.28V | 4.92V | 11.95V | 4.97V | |||||
| Test | 9A | 18A | 60A | 2A | 839.4W/ | 85.6% | .99 | 22°C/ |
| 3.26V | 4.90V | 11.94V | 4.95V | |||||
| Test | 15A | 15A | 2A | 0A | 148.4W/ | 82.5% | .98 | 22°C/ |
| 3.32V | 4.96V | 12.13V | 5.09V | |||||
| Test | 0A | 0A | 70A | 0A | 830.3W/ | 86.8% | .99 | 22°C/ |
| 3.29V | 4.94V | 11.93V | 5.03V | |||||
First observaion is test 0 which shows very good efficiency while the unit is in standby.
Going across the columns of the table for cold loads, we find that the 3.3V dropped 3% going from 10 to 100% load. +5V dropped almost 2.5%. This isn't too bad, especially considering that this unit uses DC to DC for the +3.3V and +5V. +12V, on the other hand, barely dropped 2%.
If we look at test 3, 5 and 8 (20%, 50% and 100%), we can see that we just missed the 80 Plus Gold criteria (87%, 90%, 87%) with this unit. Instead, we have very respectable silver performance. The numbers are so close, it's barely worth mentioning. Different variables come into play that could cause the efficiency to be slightly different between my unit and the one that 80 Plus tested, such as how the loads are distributed across the rails or how well the connection is between the modular cables and the PSU body or the connection between the connectors and the load tester itself.
One thing to note is a strange electrical noise I heard during test 3. Once I proceeded to test 4, the noise went away. A second sample provided by Corsair exhibited no such noise.
Another thing to note is that the fan does not spin on this unit until temperatures reach a certain point. For me, the fan didn't start spinning until test 5, and this can be seen in the temperature results. As the fan began to spin, it pulled in more of the room temperature air, dropping the intake temperatures, and increased the exhaust temperatures. The fan was barely audible, especially over the roaring noise of the SunMoon's exhaust fan. By test 8, the fan seemed to step up to an audible level, but nothing in the least bit annoying.
Cross load results were very acceptable. Not that such loads are realistic, but because this unit is essentially a +12V PSU with DC to DC modules regulating the +3.3V and +5V, cross loading results are expected to be uneventful.
Let's see what the oscilloscope has to show us...
|
Oscilloscope Measurements for Corsair AX850 | |||||
|
Test # |
+3.3V |
+5V |
+12V |
+5VSB | |
|
Test 1 |
|
|
|
| |
|
Test 2 |
|
|
|
| |
|
Test 3 |
|
|
|
| |
|
Test 4 |
|
|
|
| |
|
Test 5 |
|
|
|
| |
|
Test 6 |
|
|
|
| |
|
Test 7 |
|
|
|
| |
|
Test 8 |
|
|
|
| |
|
Test 9 |
|
|
|
| |
(CL2) |
|
|
|
| |


Very clean voltage here. One would say "uneventful" if it weren't for that +5VSB. What the heck is that thing doing? Each test produced a different waveform even though the load is 2A on all but the crossload tests. And then, during the crossload tests, when there's no load on the +5VSB, there's a different wave form depending on the crossload. With all of the load on the +12V, the +5VSB waveform is down right out of control! Very strange.
Now for the hot load tests....
Hot loads are produced by pumping the hot air produced by the load in the load tester into the intake of the power supply:
| Corsair AX850 HOT load tests | ||||||||
| Test # | +3.3V | +5V | +12V | +5VSB | DC Watts/ | Eff. | Power | Intake/ |
| Simulated system load tests | ||||||||
| Test | 0A | 0A | 0A | 2A | 10.1W/ | 47.6% | .80 | 26°C/ |
| 3.38V | 5.02V | 12.19V | 5.06V | |||||
| Test | 1.5A | 2A | 5A | 2A | 85.8W/ | 83.4% | .96 | 26°C/ |
| 3.37V | 5.01V | 12.16V | 5.05V | |||||
| Test | 2.5A | 4A | 11A | 2A | 171.6W/ | 86.8% | .98 | 26°C/ |
| 3.35V | 5.00V | 12.12V | 5.04V | |||||
| Test | 4A | 7A | 20A | 2A | 299.8W/ | 89.6% | .99 | 26°C/ |
| 3.33V | 4.98V | 12.07V | 5.02V | |||||
| Test | 5A | 10A | 29A | 2A | 425.5W/ | 89.6% | .99 | 30°C/ |
| 3.32V | 4.96V | 12.05V | 5.00V | |||||
| Test | 6.5A | 13A | 38A | 2A | 551.6W/ | 88.7% | .99 | 32°C/ |
| 3.30V | 4.94V | 12.01V | 4.99V | |||||
| Test | 8.5A | 15.5A | 47A | 2A | 675.2W/ | 87.9% | .99 | 33°C/ |
| 3.28V | 4.92V | 11.97V | 4.97V | |||||
| Test | 9A | 18A | 60A | 2A | 840.4W/ | 86.3% | .99 | 35°C/ |
| 3.26V | 4.90V | 11.94V | 4.95V | |||||
| Test | 15A | 15A | 2A | 0A | 148.5W/ | 82% | .98 | 34°C/ |
| 3.32V | 4.96V | 12.15V | 5.09V | |||||
| Test | 0A | 0A | 70A | 0A | 831.9W/ | 86.8% | .99 | 35°C/ |
| 3.30V | 4.94V | 11.89V | 5.03V | |||||
Well that's interesting! It seems that some of my efficiency numbers have gone UP! Hmm.... I guess the AX850 needs breaking in just like a high performance racing engine. I still didn't hit 80 Plus Gold, though.
Now that we've wrapped up the load tests, let's open up this beast and have a look inside.Page 4 -
19 screws hold this power supply together... NINETEEN SCREWS! Sure, four hold the modular PCB to the housing, but NINETEEN SCREWS!

Once disassembled, we can see that the Corsair AX850 is based off the Seasonic X-Series power supply.

The first thing you'll probably notice here is that the unit almost completely lacks wires. This is because +12V only connectors, like PCIe, ATX12V, and even the +12V wires that go to the 24-pin power connector, are all fed directly to the modular connectors soldered onto the PCB. Then there are only a handful of +12V wires going to a PCB that has the DC to DC converters as well as modular connectors for peripheral, SATA and the remaining 24-pin power wires on it.
First, our line power goes through a Delta EMI Filter...

After this stage, we go to a typical, albeit stout, transient filter stage.....

In the middle of the above picture, we see our X capacitor, in the lower left we have our two Y capacitors, and located just above the ferrite coil to the right, we have an MOV. There is also a relay in the area of the power supply.

The way this relay is utilized is pretty clever. A thermistor is used in series with the AC input. This thermistor is used to measure and protect against inrush current. Once the PSU is already up and running, the relay is energized and the path to the thermistor is cut off. This increases efficiency by not including the thermistor in the primary circuit.
After this stage, we get to our rectifying stage. To the far left of this same photo, we see two GBJ1506 rectifying bridges screwed to a heatsink.

Three Infineon 6R160C6 power MOSFET's are used on the APFC circuit. The diode is an STPSC806D. The switching transistors used as the main converter is located on the reverse side of this heatsink and are two more of the 6R160C6 MOSFET's

Filtering is done by a pair of Chemi-Con 420V 390uF capacitors rated for up to 105°C operation. Located on a small PCB just next to these capacitors is an IC for controlling the APFC circuit, which is an On Semi NCP16543.

This power supply uses a Champion Micro CM6901 resonant mode controller. Using an LLC resonant topology improves efficiency by changing the switching frequency in response to changing loads.
Speaking of resonant mode controllers.... because the +5VSB is essentially a separate power supply within the power supply, it needs it's own controller. Here, Seasonic uses an Infineon ICE2QR4765 controller.

Now moving to the secondary side of this power supply, things start to really get fun!

Typically, one would use diodes to rectify voltages, and these diodes would be mounted to the secondary heatsink. But this unit uses a set of four Infineon 031N06L MOSFET's.

Add to this that they are mounted to the bottom of the PCB!

Add to this that the heat from the MOSFET's package is dissipated by the power supply housing!

Add to this that shining a light through a prism onto this power supply reveals the image of a unicorn. Ok... maybe not.
The filtering of the +12V is handled by a number of capacitors, mostly solid state capacitors, located in the very middle of the board.

At the top of the above photo, you can see where the row of +12V only powered modular connectors are soldered directly to the board. This completely eliminates any DC wires inside the unit, outside of those delivering +12V power to the DC to DC converters.
For +5V and +3.3V output, Seasonic uses DC to DC converters mounted to the modular PCB.

This part of the power supply uses an APW7159 IC while four Infineon 060N03L power MOSFET's regulate the +5V output and four more of the same power MOSFET's regulate the +3.3V.

The filtering stage for the +3.3V and +5V are on the other side of the modular PCB...

The supervisor IC used on this unit is the Silicon Touch PS223. It's responsible for OCP, OVP and UVP.

Finally, the fan that keeps all of these components cool is a Sanyo Denki San Ace 120 double ball bearing fan.

In the above picture, you can see a primitive baffle is used to force the air towards the front of the PSU so it doesn't all immediately escape out the back. It's not as fancy as some baffles I've seen, but I'm sure it gets the job done.
Well... That was a hell of a break down. Let's go ahead and score this thing now.Page 5 -
Power supplies at jonnyGURU.com are scored in four categories: performance, functionality, value and aesthetics. Each category has a different weight that effects the overall score.
Performance (40% of the final score) - The AX850 really performs well. Voltage regulation was good, efficiency was excellent, albiet not to Gold standards in my unit, the fan produced virtually no noise and, other than some funky waveforms coming from the +5VSB, ripple suppression was fantastic. 9.5.
Functionality (20% of the final score) - You can't knock a PSU for being FULLY modular at all. My compaint was the mix of flat with sleeved cables. Some people like the flat cables, while others like the sleeved cables. Something bothers me about the mixing of the two. The PSU is compact, so that's a plus and they include an on/off switch on the back, which is also a plus. I feel comfortable giving the unit a 9.5 here too.
Value (30% of the final score) - The AX850 typically sells for around $189.99. This is rather expensive for an 850W power supply. There are other 80 Plus Gold modular power supplies for less. That said, this PSU is not, by any means, a "cheap" power supply in build quality. I'm going to be fair here and give this PSU an 8 for value.
Aesthetics (10% of the final score) - This unit has very tame looks. It's a flat back finish with "Corsair AX850" stickers on each side. Nothing too flashy, but sometimes that's a good thing. I think the biggest aesthetic anomaly here is the hodge podge of cables. I'm going to give this unit an 9 for aesthetics.
When we put this all together, we get a total score of 9, and thus the unit gets a "jonnyGURU recommended".
| Performance | 9.5 |
| Functionality | 9.5 |
| Value | 8 |
| Aesthetics | 9 |
Total Score | 9 |

Summary
Computer power supplies have come a long way in just the last couple of years. With the implementation of resonant mode topologies and DC to DC converters for non-primary DC output, we've seen efficiency increase more and more. The AX850 is an example of how to implement these features as effectively as possible by avoiding the high ripple typically associated with resonant mode topology and the poor voltage regulation typically associated with DC to DC converters under load. The cost is high, but you get what you pay for.
The Good:
- Efficiency just below 80 Plus Gold
- Quiet, especially when the fan didn't spin at all!
- Decent voltage regulation
- Fully modular
- Good ripple suppression
The Bad:
- Nothing really bad to say here.
The Mediocre:
- The price is high... but you get what you pay for!
- Hodge podge of modular cables. Some sleeved... some flat.
http://www.jonnyguru.com/modules.php?name=NDReviews&op=Story&reid=197
Langganan:
Postingan (Atom)